The My Network page contains information about you or your business, as well as a complete list of channels that you have created. Your Public Name serves as part of the URL for this page.
Upload Your Profile Images
After creating your account, the first step is to upload your personal avatar and banner. In the header area of the My Network page, find and click the camera icons to begin uploading your images for each section.
Create a Channel
Below your new avatar is a “Create Channel” button. Click this to open up the Create Channel form. Make sure to complete all necessary fields. You may create and manage as many channels as needed.
Once your channel is created, the channel thumbnail will feature two icons: a gear in the top-right corner which leads to your Production Studio and a play button in the top-left corner to watch your channel.
Bio, Top Channels, and More
On the right side of your My Network page, you have the opportunity to share your story with followers through adding a bio. For convenience and ease of access, we have also added our Top Channels and a list of your Favorites right on the My Network page.
The Production Studio is where the creativity begins. In your personal studio, you are the producer. Please note, you must have a channel created in order to access the Production Studio, within which there are two (2) different creation modes: Basic and Advanced.
Basic
The Basic mode allows you to instantly create a schedule for the current day and watch it immediately. In Basic mode, you may use the Autopilot feature on the right side of the screen to tell the system to automatically create schedules for you on a daily basis.
Advanced
The Advanced mode provides a method for building a Custom Schedule, which may be applied to the current date or a future date of your choice. Strimm has built in the flexibility to allow you to switch seamlessly between the modes per your needs. Simply click the “Advanced Mode” switch below the Instant Schedule button on the right side of the screen to change modes.The Advanced mode allows you to create a Custom Schedule for today or any day in the future. You can easily switch from one mode to another by clicking on the “Advanced Mode” switch below the Instant Schedule button.
Get to Know Your Production Studio in Basic Mode (Core Elements)
- Channel Edit/Update is located in the header of the page. Click the gear icon next to the channel name to access it. Here, you can update your channel’s avatar and category, and add or edit your channel description. You may also delete a channel. If you have your own website and have subscribed to one of our channel embedding plans, then you can use this section to get the embed code for your channel and activate all of your subscribed functions.
- Video List is the area where your channel’s video content is located. These videos can be scheduled by you for a broadcast on your channel. To add video content to your channel, simply click the “Get New Videos” button and proceed to add videos from different sources. To remove videos, simply click the trash icon in the top-right corner of the thumbnail or use the “clear videos” option above. When there are more than 15 videos in a list, you may click “load more” to see the remaining videos.
- Get New Videos is where new video content for your channel can be acquired.
Choose from the several sources:
- A) Search
This is the area to search for video content by keywords.
Step 1. Select a video provider from the list. You may source videos from YouTube, Vimeo, or Dailymotion.
Step 2.Use the search bar to enter keywords of videos you would like to include on your channel. If you are searching for longer videos, be sure to check the box next to “> 20 min”.
Step 3.Once your search results appear, select the category which best fits the chosen video(s) and click the + button on each video thumbnail (which appears on mouse over) to add them to your channel. Only videos made public by the provider will be available to you. If video is not available, it will be marked as “Restricted by Provider”.
- B) Import
-Import via URL
Step 1.Select “Import by URL” and then select a video provider from the list.
Step 2. Copy and paste the URL of the video from the selected provider and click “import”. Next, select the category from the dropdown menu and click the + button on the video box on mouse-over to add it to your channel.
-Import Private Video
This feature is only available to subscribers of a Professional Plan (paid plan). Using this option, you can add Private Videos (direct links) to your channel, such as videos from your own server or the servers you have authorization from or the videos, which are marked as “unlisted” on YouTube, Vimeo or Dailymotion. Please check the latest video “privacy” settings of each platform to allow the video to be embedded elsewhere and broadcast there. Some providers, especially Vimeo, have many types of privacy settings. Some of them may not allow broadcast outside of the original platform. As for YouTube, you should only mark videos as UNLISTED. This way, the video will be removed from the public search, but can be added as a direct link to your Strimm TV channel.
Please note that channels with TV programs featuring “private videos” will not broadcast on Strimm’s website and can only be shown on your own personal website, in the embed mode.
If the video is added from your own private server, please make sure that the video link is a direct HTTPS link to the video. The private server should be setup for the video streaming with a built-in Content Delivery Network (CDN). The video link should end in .mp4 and be in MP4 format.
Step 1. Select “Import by URL” and then select “Import Private Video”
Step 2. Complete all fields in the form and click “Add Video” button. Make sure to insert an exact duration for the video.
If you would like to add mature content to your channel, then you need to switch “Allow Mature Content” to the ON position in the channel settings before adding the content.
C) My Videos.
The My Videos tab is your personal video library sorted by category. It will display all of the videos you have chosen to add to your channels from all sources. You can access your videos at any time and add them to any channel you manage. If you accidentally delete a video from a channel, you can easily re-add it from the My Videos page.
Schedule Creation Control Panel
The Schedule Creation Control Panel is where you will schedule your broadcasts. It’s located on the right side of the Production Studio page.
- A) Instant Schedule is a feature that randomly combines videos from your Video List and creates a schedule for you. After cultivating the schedule, review it and click “Publish”. It will begin broadcasting immediately through midnight of the current day. In order for this feature to work, you must have at least 3 different and non-restricted videos in your Videos List and enough time to play them before midnight. When Instant Schedule is selected for a future date, the airtime is midnight to midnight on the day selected.
- B) Autopilot is a feature that lets the system do the work for you. When activated, Autopilot will automatically generate a schedule for your channel for the following day at 11:00am (Central Time) daily. The schedule will begin broadcasting at midnight and go through midnight of the following day. In order for Autopilot to work, you must have at least 3 different and non-restricted videos in your Video List. Autopilot will continue creating schedules for your channel every day until it is turned off. If Custom Schedule is created on certain day (using Advanced Mode), the Autopilot will skip schedule generation for that day.
Remember: Videos in your list may be removed (become restricted) by the video provider at any time. Regularly add fresh video content to your channel to grow your list and to avoid broadcast interruption. It is not recommended to leave Autopilot on for an extended period for this reason. This may cause your channel to repeat similar programs daily or simply stop broadcasting altogether.
- C) Delete. If you are unhappy with your schedule selection, you may delete it.
Get to Know Your Production Studio in Advanced Mode
Advanced mode has the same features as Basic mode and more! Additional Schedule Creation Control Panel elements are located on the right side of the Production Studio and allow you to schedule a broadcast in Advanced mode.
- A) Calendar is located in the top-right corner of the page. To view an existing schedule or select a new one, simply click to select a date from the calendar. The dates that have a broadcast scheduled are clearly marked in the corners. Mouse over a marked date to see the scheduled programming.
- B) Custom Schedule. Would you like to be a true producer? With Strimm, you can be. Take complete control over the programming on your channel with the Custom Schedule feature. To begin, select a date from the calendar. Then, click on “Custom Schedule”, choose a start time, and click “Create”. Begin adding videos from your list of videos by clicking the + button (which appears on mouse over). The start and end time of each schedule (playlist) is up to you. You may stop adding videos and choose a new start time to run multiple schedules for the same day. Once you are finished scheduling your broadcasts for the chosen date, click “Publish” to activate each schedule.
- C) Repeat. Once you have created a schedule, you have the option to repeat it on any future dates. Simply click “Repeat” above a created schedule, select the desired repeat date, and click “OK”.
- D) Internal search for videos in the channel. Looking to sort through your videos to quickly and easily find a particular one? Simply click the magnifying glass and enter the name of the video you are searching for.
Broadcast LIVE on Strimm
Would you like to stream a live event on your TV channel? It is easy with Strimm! The event is streamed through YouTube Live or Vimeo LIVE and will appear on your Strimm TV channel. The steps are simple:
A) Go to YouTube LIVE or Vimeo LIVE, schedule a live event and copy its URL. Alternatively, you can copy URL of any broadcasting live event.
B) Go to Production Studio of your Strimm channel, click “Get New Videos”:
- 1) Select “Import” and YouTube as a provider.
- 2) Paste the URL of a live event
- 3) Select category
- 4) Click on “+” button on video (appears on mouse over) and pick the start date and time (mandatory) and end date and time (optional)
- 5) Click “Save”. The scheduled live event will be added to your channel. No further scheduling is needed.
C) To watch live stream:
Go to your TV channel (embedded on your website or on Strimm.com), click LIVE button and select the live event you want to watch.
Note: Please check the latest YouTube Live rules to see if you are eligible to embed YouTube Live stream outside of Youtube.com. You may need to have a certain number of subscribers and channel views to be eligible.
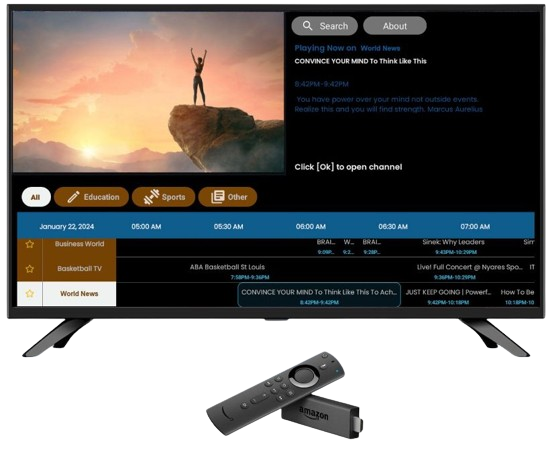
Channel
The Channel page is where your work will be displayed for the world to watch! You may visit this page by clicking the avatar with the play button on it on the Network page or in the Production Studio or by using a direct link. Be sure to share your channel link with your friends and followers to attract viewers to your next broadcast.
The Channel page offers the following controls and features, located on the right side:
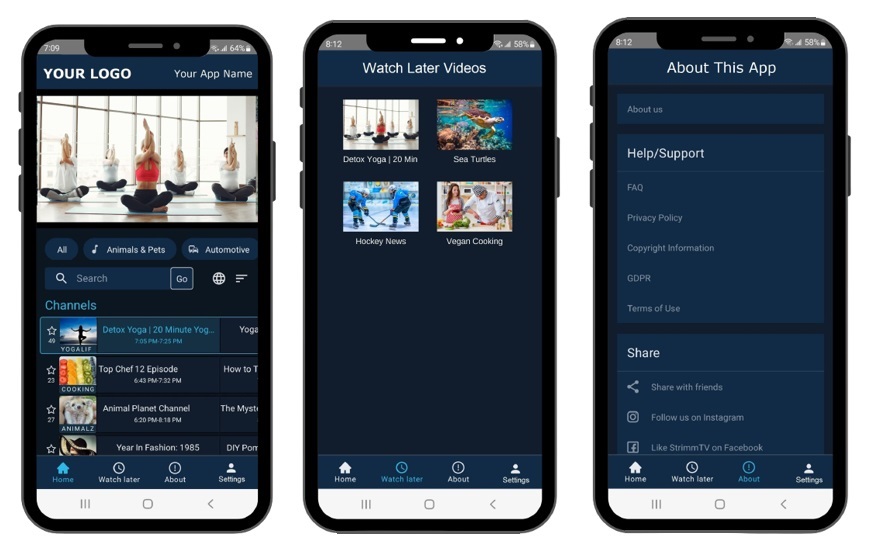
1. Guide. Click this button to easily access all channels on Strimm’s platform.
2. Channel Schedule. Click this button to see today’s schedule of the channel or save videos to watch them later in your personal “Watch Later” area.
3. Channel Info. Click this button to learn more about the channel, rate it, like it, and add the channel to your Favorites or report abuse.
4. Video Info. Click this button to learn more about the video.
5. Chat. Interact with other users in the comment section of the chat.
Channel Embedding
Do you have a website? Now, you can broadcast your TV channel on your own website and grow your brand like never before! First, select a plan on our
Plans & Pricing page and subscribe to it.
Single Channel Embedding
Follow the steps below in order to embed a channel on your website:
1. Go to your channel’s Production Studio and click the gear icon next to channel name (settings).
2. Switch the “Embed This Channel On My Website” to ON.
3. Enter the URL of the website where you’d like your channel embedded.
4. Copy the embed code and paste it in the area of your website, where you want your TV channel to appear.
5. If you are subscribed to special features, like White-Label, Custom Branding, etc., then switch these features ON as well, if you wish.
6. Click “Update” to save the settings.
Multiple Channels Embedding.
- A. If you want all of your embedded channels to appear in the GUIDE area of your default channel and be watched without leaving the page, then embed the code of your default channel only (the channel, which you want to appear first on your screen).
As for the remaining, non-default channels, simply follow the steps above (steps 1-6) and skip step # 4 (code embedding).
- B. If you need your channels to appear on different pages or different websites, then you would need to enter the URL of that website in the channel settings of each channel and paste the embed code of each channel on the desired page of the website.